Atari Punk Console Tiger 0.1
Revision as of 15:00, 25 July 2012 by Andreas (talk | contribs) (Created page with "== DIY Atari Punk Console Tiger 0.1 == thumb|right|200px|Skematik Atari Punk Console Tiger 0.1 Bagi siapapun yang ingin merakit instrumen ...")
DIY Atari Punk Console Tiger 0.1
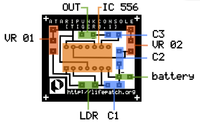
Bagi siapapun yang ingin merakit instrumen Atari Punk Console Tiger 0.1 tanpa mengikuti workshop ini dapat dilakukan dengan cara mengunduh file PCB artwork Atari Punk Console Tiger 0.1 dan mencetak PCB artwork tersebut. Setelah itu, ikuti petunjuk yang telah disediakan di gambar Skematik Atari Punk Console Tiger 0.1. Adapun komponen yang diperlukan dapat diperoleh dengan mudah di toko-toko elektronik terdekat. Daftar komponen yang dibutuhkan antara lain adalah:
- IC = IC 556 Dual timer
- Out = Mini Jack Socket (Mono)
- VR 1 = Variabel Resistor (Potensiometer) 500K
- VR 2 = Variabel Resistor (Potensiometer) 500K
- LDR = Light Dependent Resistore (LDR)
- C1 = Capacitor Ceramic 0.01uF
- C2 = Capacitor Ceramic 0.1uF
- C3 = Capacitor Electrolyte 10uF
- Battery = Battery socket kotak 9V + Baterai socket 9V
Optional:
- IC socket
- Switch
